Disclaimer
The following article is for educational purposes only. It is not advisable to use the contract in the example for anything other than what is presented in the article.
As an investor or a developer, you’ll find that keeping track of DeFi projects is not as simple as it may sound. There are many reasons to feel restless when you don’t know how they are behaving, so you decide that you need some sort of app for that. While you’ve mastered the ways of the chart and data analysis, you are having trouble getting data. If that’s the case, welcome to the third of four articles on Snapshots with C#.
The main goal for this series is to get you acquainted with the Nethereum library that we’ll be using for said purpose and then develop our very own snapshot tool. After reading this third article, you’ll be able to make your own snapshot. From there, you can go back and read about what a snapshot is or how to validate an address, or go to the next article and learn to use your data to perform analysis.
Requirements C#, JavaScript, and D3.JS (optional)
Stack MongoDB, ASP.NET MVC
Nugets MongoDriver, Nethereum
Difficulty 3/5
Repository https://github.com/labs-agap2it/SnapshotExample
Building a snapshot tool
Nethereum doesn’t have a snapshot library, but it has a processing unit that we can use to parse a group of blocks. For each block found, there are four phases: the block, transaction, transaction receipt, contract creation, and log.
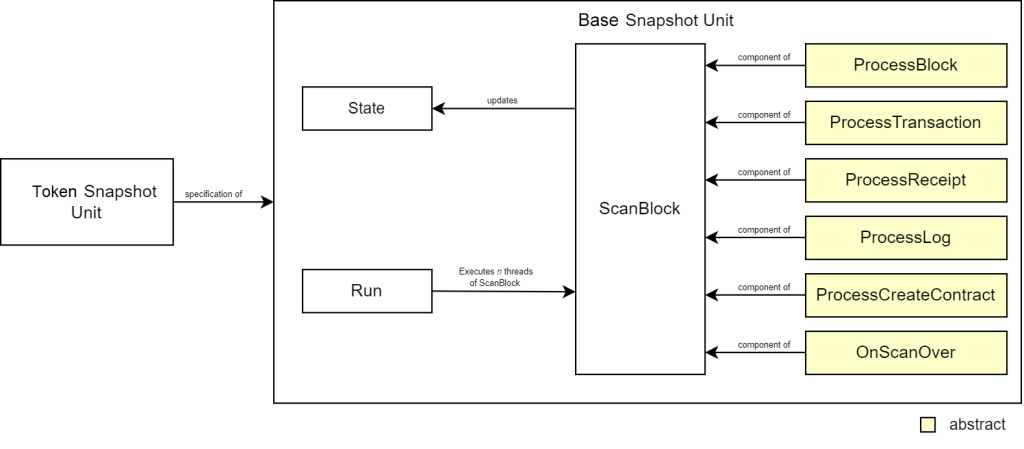
To provide recovery and multi-threading to our snapshot, our base snapshot uses this processing unit to parse a single block. There are many approaches to the development of a snapshot unit. You can use tons of generic types and delegation to write most of the code in a base snapshot, or you can follow an abstract approach with one generic type and inherit the code among the generic unit and the specific unit (token snapshot unit). The following figure uses the latter.

The state can be stored in the base unit or the specification. If you store it in the base unit, you’ll need to add a generic type to it. If you store it in the specification, each one has its own state, which can eventually become confusing and prone to code repetition. In our case, we use a generic type to identify the main component of the scan (the block) which we will specify during the development of TokenSnapshotUnit. In BaseSnapshotUnit, each abstract function lacks a body. We will be writing its code in the specification as well.
public abstract void ProcessBlock(BlockWithTransactions block, TBlock snapshotBlock);
public abstract void ProcessTransaction(TransactionVO transaction, TBlock snapshotBlock);
public abstract void ProcessReceipt(TransactionReceiptVO receipt, TBlock snapshotBlock);
public abstract void ProcessContractCreation(ContractCreationVO contractCreation, TBlock snapshotBlock);
public abstract void ProcessLog(FilterLogVO filterLog, TBlock snapshotBlock);
The ScanBlock is executed as many times as needed, per thread. By creating a block processor, we can decide what to do in each step with these abstract methods. The processor is called and the OnScanOver function is called. If in any case, the scan transaction starts throwing out exceptions, it might be due to the security protocol. To mitigate this, we’ve assigned TSL, TSL 1.1, or TSL 1.2 to the request protocols.
protected virtual async Task ScanBlock(long blockNumber, TBlock block)
{
   ServicePointManager.SecurityProtocol = SecurityProtocolType.Tls12 | SecurityProtocolType.Tls11 | SecurityProtocolType.Tls;
   var web3 = new Web3(_rpcUrl);
   var processor = web3.Processing.Blocks.CreateBlockProcessor(steps =>
   {
      steps.BlockStep.AddSynchronousProcessorHandler(b => ProcessBlock(b, block));
      steps.TransactionStep.AddSynchronousProcessorHandler(t => ProcessTransaction(t, block));
      steps.TransactionReceiptStep.AddSynchronousProcessorHandler(tr => ProcessReceipt(tr, block));
      steps.ContractCreationStep.AddSynchronousProcessorHandler(cc => ProcessContractCreation(cc, block));
      steps.FilterLogStep.AddSynchronousProcessorHandler(fl => ProcessLog(fl, block));
   });
   var cancellationToken = new CancellationToken();
   await processor.ExecuteAsync(blockNumber, cancellationToken, blockNumber);
   //OnScanOver(block, blockNumber);
}
Don’t forget to add the dependencies. You’ll notice that the last line of our code is commented. That’s because we still haven’t made the OnScanOver function.
Before we move forward, let’s talk a bit about our recovery mechanism. As you know, the number of RPC calls we need to make depends on the number of blocks we need to process. The system doesn’t know which transactions we need, so you’ll have to process as many requests as the blocks and transactions between the first and last blocks. Eventually, you’ll come across timed-out errors or request denials. We must make sure that the request can be executed again and that, in case of failure, it’s possible to recover the last state of the system. Our approach to this is a checklist of processed blocks that is eventually stored in a database. Together with the result of each block processing result, we compose our “state”. We want to avoid issues caused by interacting with collections that are changed by threads, so let’s add functions that return read-only collections with the blocks and the state.
public TBlock[] GetBlocks()
{
   return _blocks.AsReadOnly().ToArray();
}

public ProcessedBlock[] GetProcessedBlocks()
{
   return _processedBlocks.AsReadOnly().ToArray();
}
We can assign the responsibility of persisting the state in another component of our system by allowing read access to the block and process block lists.
For our multithread mechanism, we need to implement a way for the threads to know which block should they scan for. When the thread starts a new scan, a new element is added to the processed block list. When the scan finishes, that element’s flag changes to true. The OnScanOver is ideal to deal with the state update.
public virtual void OnScanOver(TBlock block, long blockNumber)
{
    lock(_lock)
   {
      var processedBlock = _processedBlocks.First(x => x.BlockNumber == blockNumber);
      processedBlock.IsCompleted = true;
      _blocks.Add(block);
   }
}
All that’s left is the Run function. This function is responsible for setting up the threads and adding the recovery mechanism. The thread management uses the processed block list to find which blocks haven’t been processed and assign them to block processors. To avoid having too much code in the thread setup, we’ll have an ExecuteScan function. Our recovery mechanism is quite simple, but effective. We’ll surround our execution in a try…catch block. Whenever an exception is launched, the thread waits 20 seconds and then executes the request again.
protected virtual async Task ExecuteScan(long startAt, long endAt)
{
   _startAt = startAt;
   _endAt = endAt;
   while (true)
   {
      long nextBlock = -1;
      lock(_lock)
      {
         _processedBlocks = _processedBlocks.OrderBy(x => x.BlockNumber).ToList();
         var last = _processedBlocks.LastOrDefault();
         nextBlock = last == null ? startAt : last.BlockNumber == endAt ? -1 : last.BlockNumber + 1;
         if(nextBlock != -1)
         {
            _processedBlocks.Add(new ProcessedBlock() { BlockNumber = nextBlock, IsCompleted = false });
         }
      }

      if (nextBlock == -1) break;
      while (true)
      {
         try
         {
            await ScanBlock(nextBlock, new TBlock());
            break;
         }
         catch
         {
            _logger.LogError("Error. " + ex.Message);
            Thread.Sleep(Convert.ToInt32(_timeoutWindow));
         }
      }
   }
}
We are also adding a list of blocks and processed blocks to be loaded, so that the system can resume a failed attempt at a snapshot.
protected virtual void Run(long startAt, long endAt, List<TBlock>? blocks, List<ProcessedBlock>? processedBlocks)
{
   _blocks = new();
   _processedBlocks = new();
   if (blocks != null)
   {
      foreach (var block in blocks)
         _blocks.Add(block);
   }
   if (processedBlocks != null)
   {
      foreach (var block in processedBlocks)
      {
         if(block.IsCompleted)
         _processedBlocks.Add(block);
      }
   }
   var blocksAlreadyProcessed = processedBlocks == null ? 0 : processedBlocks.Count;
   var threadsToSet = endAt - startAt - blocksAlreadyProcessed + 1;
   threadsToSet = threadsToSet > _maxThreads ? _maxThreads : threadsToSet;
   for (var threadCounter = 0; threadCounter < threadsToSet; threadCounter++)
   {
      Task.Run(() => ExecuteScan(startAt, endAt));
   }
}
One last addition to our base snapshot is a function that checks if the snapshot is running. This way we can make it so that functions like the persistence update only is executed while the snapshot is running.
public bool IsSnapshotRunning()
{
   lock(_lock)
   {
      return _processedBlocks.Count < (_endAt - _startAt + 1) || _processedBlocks.Any(x => !x.IsCompleted);
   }
}
That’s it for our base snapshot. Now, let’s focus on some rules to filter out transactions that aren’t related to a token address.
Contract Snapshot
Our contract snapshot will look up for transactions related to that address. Taking a look at the concept of a transaction, we can see two addresses, From and To. As you may have guessed, From identifies the source of the call and To is the target.

If we were looking for a tokenless contract, looking at those two addresses would probably be enough. It would depend on whether you know the contract well and if you were sure that in the code there weren’t weird calls to other contracts. If our target target is keeping balances, then we need to do a bit more than that. Tokens can be bought in a swap which means that the while our wallet still shows in the From field, the To field will have the swap’s router address.

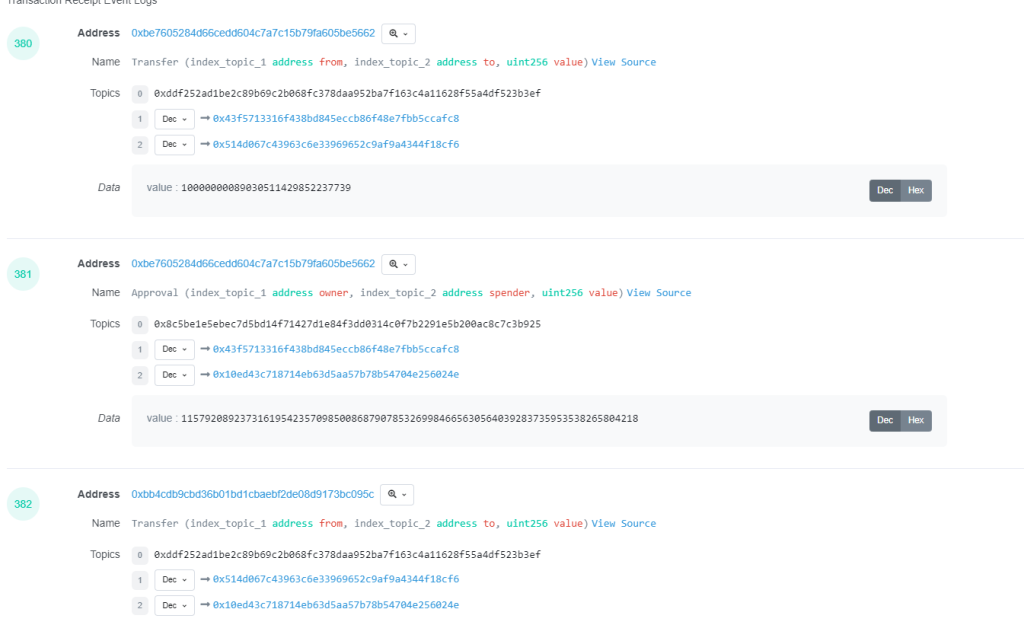
If we look at the logs, we notice the same pattern we saw in our first article.

Considering that there’s no way to decide which log will have the transfers, we’ll have to look at all the logs of all the transactions in each block, gather the addresses and filter the transactions based on whether they have the address we are looking for or not. But first, we need our model.
We need to keep the blocks as a timeline. We can remove the ones we don’t need later on. The contract Creation will only show up as one of our first transactions and the transaction receipt will tell us if we should ignore the transaction or not, since we don’t care for unsuccessful transactions.

Depending on how you want to have things organized, it could make sense that the snapshot library only keeps code that can be reused for every type of snapshot. If you were building a professional application, you would want to have the snapshot library as part of a set of services. In our case, we will create the model and the snapshot specification in our web application.
Let’s create two new folders. One for the snapshot units and another one in the Model folder for the snapshots.

First, we create the model classes. To reduce the amount of code in our snapshot unit, one of the things we’ve added were converter methods called “From” that extract the information we need from the processed object.
public class SnapshotBlock
    {
        public long Number { get; set; }
        public string Hash { get; set; }
        public string TimeStamp { get; set; }
        public List<SnapshotTransaction> Transactions { get; set; } = new();

        public void From(BlockWithTransactions block)
        {
            Hash = block.BlockHash;
            Number = (long)block.Number.Value;
            TimeStamp = block.Timestamp.Value.ToString();
        }
    }
public class SnapshotTransaction
    {
        public string AddressFrom { get; set; }
        public string AddressTo { get; set; }
        public string Hash { get; set; }
        public SnapshotTransactionReceipt Receipt { get; set; }
        public List<SnapshotLog> Logs { get; set; } = new();
        public SnapshotContractCreation ContractCreation { get; set; }

        public void From(Transaction transaction)
        {
            Hash = transaction.TransactionHash;
            AddressFrom = transaction.From;
            AddressTo = transaction.To;
        }
    }
public class SnapshotTransactionReceipt
    {
        public string? Error { get; set; }
        public bool Success { get; set; }

        public void From(TransactionReceiptVO receipt)
        {
            Error = receipt.Error;
            Success = receipt.Succeeded;
        }
    }
public class SnapshotContractCreation
    {
        public string ContractAddress { get; set; }
        public bool Success { get; set; }

        public void From(ContractCreationVO contractCreation)
        {
            Success = !contractCreation.FailedCreatingContract;
            ContractAddress = contractCreation.ContractAddress;
        }
    }
public class SnapshotLog
    {
        public string Data { get; set; }
        public string Address { get; set; }
        public int BlockLogIndex { get; set; }
        public string Name { get; set; }

        public void From(FilterLog log, string name)
        {
            Data = log.Data;
            Address = log.Address;
            BlockLogIndex = (int)log.LogIndex.Value;
            Name = name;
        }
    }
We are all set to start working on our “TokenSnapshotUnit” class. Considering the type of analysis, we can get all the data from the logs, transaction receipt, contract creation, and the block. So we can, at least, skip the transaction step. Since we can’t hardcode function numbers, as they depend on the ABI (see article 2), we’ll need to decode every log in a transaction, which means we aren’t going to work on the log step as well.
public override void ProcessTransaction(TransactionVO transaction, SnapshotBlock snapshotBlock) {}

 public override void ProcessLog(FilterLogVO filterLog, SnapshotBlock snapshotBlock) {}
There’s some data that it’s going to be needed through the steps, so we need to override the Run method to accept an address, besides the other arguments. The address needs to be added to the class as well.
private string _address="";

public TokenSnapshotUnit(IOptions<BlockchainOptions> options, ILogger<TokenSnapshotUnit> logger) : base(options, logger){}

public void Run(long startAt, long endAt, string address, List<SnapshotBlock>? blocks, List<ProcessedBlock>? processedBlocks)
{
   _address = address;
   Run(startAt, endAt, blocks, processedBlocks);
}
Back to our steps, processing a block means using the From function to convert it into a SnapshotBlock. We can also work on the contract creation step. This step will check if the contract being created is the one we are targeting. If it is and the transaction hasn’t been created yet, we can create a new one, update its state and push it into the block.
public override void ProcessBlock(BlockWithTransactions block, SnapshotBlock snapshotBlock)
{
   _logger.LogInformation($"Processing block #{block.Number}");
   snapshotBlock.From(block);
}

public override void ProcessContractCreation(ContractCreationVO contractCreation, SnapshotBlock snapshotBlock)
{
   _logger.LogInformation($"Processing contract creation for {contractCreation.ContractAddress}");

   if (contractCreation.ContractAddress != _address) return;
   var transaction = snapshotBlock.Transactions.FirstOrDefault(x => contractCreation.TransactionHash == x.Hash);
   if(transaction == null)
   {
      transaction = new SnapshotTransaction();
      transaction.From(contractCreation.Transaction);
   }
   var cc = new SnapshotContractCreation() { ContractAddress = _address, Success = contractCreation.Succeeded };
   transaction.ContractCreation = cc;
   snapshotBlock.Transactions.Add(transaction);
}
All that’s left is the receipt processing step. First, we need all the addresses associated with the transaction. We don’t need to look for them manually because Nethereum has a function for that. By checking if the address we are looking for is amongst the addresses found, we can decide to process the rest of the transaction. If the address is related to the transaction, we can check if it doesn’t, a new one is instantiated.
The question is, how do we know if we are looking at the right transaction. We are going to match transactions that are not related to a transfer. Nethereum has a useful set of features that can help with this. One of them is the DecodeAllEvents function available at the transaction receipt, which uses DTOs (Data Transfer Objects) to search and display logs related to the specific DTO.
DTO’s are used to convert an event into a comprehensible result. To do so, we need to declare the name of the event, and each of its parameters, including the type, name, order, and whether it’s indexed or not.
In this case, we’ll create a DTO for transfer events in our Snapshot Engine Library inside a DataTransferObject folder.
[Event("Transfer")]
public class TransferEventDataTransferObject : IEventDTO
{
   [Parameter("address", "_from", 1, true)]
   public string From { get; set; }

   [Parameter("address", "_to", 2, true)]
   public string To { get; set; }

   [Parameter("uint256", "_value", 3, false)]
   public BigInteger Value { get; set; }
}
Next, we use the DecodeAllEvents function with the Transfer Event DTO to fetch all the transfer logs. Lastly, we store them in the transaction and we’re done.
_logger.LogInformation($"Processing tx {receipt.TransactionHash}");
var addresses = receipt.GetAllRelatedAddresses();
if (addresses == null || addresses.All(x => x.ToLower() != _address.ToLower())) return;
var transaction = snapshotBlock.Transactions.FirstOrDefault(t => t.Hash == receipt.Transaction.TransactionHash);
if (transaction == null)
{
   transaction = new SnapshotTransaction();
   transaction.From(receipt.Transaction);
   snapshotBlock.Transactions.Add(transaction);
}
var snapshotReceipt = new SnapshotTransactionReceipt();
snapshotReceipt.From(receipt);
transaction.Receipt = snapshotReceipt;
var logs = receipt.TransactionReceipt.Logs.DecodeAllEvents<TransferEventDataTransferObject>();
foreach (var log in logs)
{
   var snapshotLog = new SnapshotLog();
   snapshotLog.From(log.Log, "Transfer");
   snapshotLog.Data = JsonSerializer.Serialize(log);
   transaction.Logs.Add(snapshotLog);
}
The last step is to connect everything with our web application and database. To this end, we need to add a tread in our controller that fetches the state of the snapshot and updates the database with it.
public void UpdateState(string name, string address)
{
   Task.Run(async () =>
   {
      var snapshot = await _snapshotDataAccessObject.GetSnapshot(name);
      if (snapshot == null)
      {
         var id= await _snapshotDataAccessObject.CreateSnapshot(new Snapshot<SnapshotBlock, List<ProcessedBlock>>() { Name = name, Address= address });
         snapshot = new Snapshot<SnapshotBlock, List<ProcessedBlock>>() { Id = id, Name = name, Address = address };
      }

      do
      {
         try
         {
            _logger.LogInformation("Starting persistence update");
            var processedBlocks = _tokenSnapshotUnit.GetProcessedBlocks().ToList();
            var blocks = _tokenSnapshotUnit.GetBlocks().ToList();
            snapshot.State = processedBlocks;
            snapshot.Blocks = blocks;
            await _snapshotDataAccessObject.UpdateSnapshot(snapshot);
            .LogInformation("State persisted");
         }
         catch (Exception ex)
         {
            _logger.LogError("Error. " + ex.Message);
         }
         Thread.Sleep(20000);
      } while (IsSnapshotRunning());
   });
}
And now, let’s update both the TakeSnapshot and LoadSnapshot, …
[HttpPost]
public IActionResult TakeSnapshot([FromForm]SnapshotRequest request)
{
   UpdateState(request.Name, request.Address);
   if (string.IsNullOrEmpty(request.Address) || string.IsNullOrEmpty(request.Name) ||
                request.StartBlock < 0 || request.EndBlock < 0 || request.StartBlock > request.EndBlock)
      return View("Index");
   _tokenSnapshotUnit.Run(request.StartBlock, request.EndBlock, request.Address, null, null);
   return View(request);
}
[HttpPost]
public async Task<IActionResult> LoadSnapshot([FromForm] SnapshotRequest request)
{
   var snapshot = await _snapshotDataAccessObject.GetSnapshot(request.Name);
   if (snapshot == null) return View("Index");
   UpdateState(request.Name);
   _tokenSnapshotUnit.Run(request.StartBlock, request.EndBlock, snapshot.Address, snapshot.Blocks, snapshot.State);
      return View("TakeSnapshot", request);
}
… and update some secondary features of the controller such as the number of blocks being processed, the flag to check if the snapshot is running, and our blocks processed.
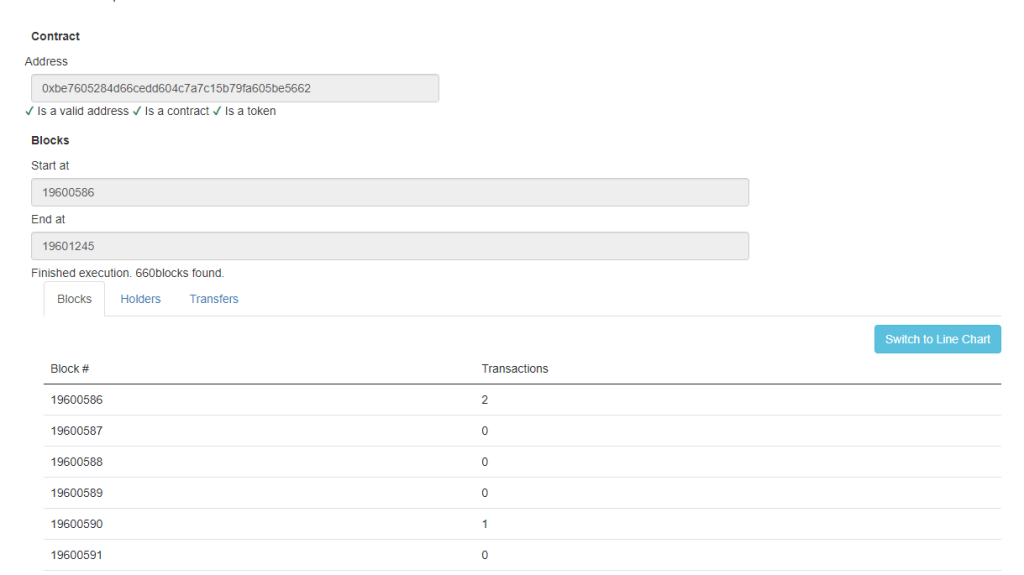
Now that we have everything ready, we can test the application. This is going to take a while since we are processing 660 blocks. Since you may face errors due to request denial, you might want to check the logs if it looks like the snapshot is not progressing. Each thread will have a 20 second delay before repeating the request.

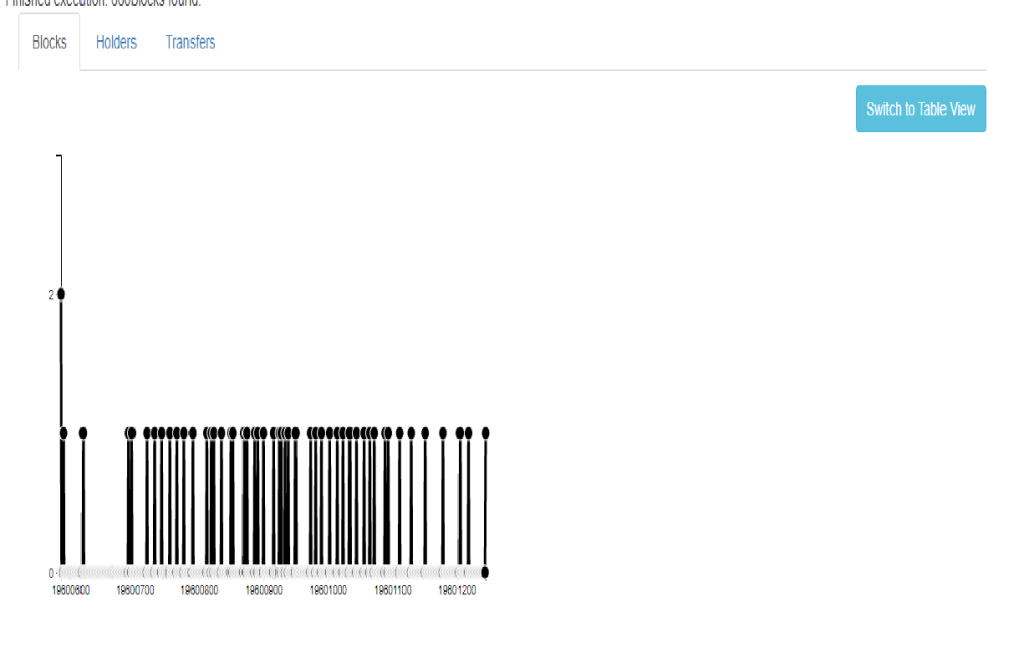
And there we have it. A fully functional snapshot. That line chart looks weird, but we’ll leave that to the next article.


Considerations
As you’ve noticed, running a snapshot might take a while. There are many ways to reduce the time required to finish one. You could increase the number of threads, but you would eventually have the same issues. You could also distribute the effort through several devices and, as long as the nodes don’t reject the requests because of your IP, it would work.
Another strategy that you could follow would be an import of as many transactions as you could by fetching them from an external source like BscScan or from a dumping service like BlockChair.
Conclusion
That’s it for our snapshot. At the end of this article you should be able to create a core for your snapshots, and create different snapshot units for specific rules.
We hope these articles were useful in your endeavors. All that’s left is to take the data and try to do some analysis. You can do so in our next article of this series.